Tuesday, April 22, 2014

Chex Mix

With an impending 11 hour road trip, I started planning what snack food we would take with us.  I had the normal cheerios, raisins, almonds, and string cheese.  I wanted something salty.  I settled on chex mix.  Below are two different ways to make it.  I always make it in the oven but I am sure the microwave directions work just fine.  I left out the mixed nuts in the original recipe since Tony's allergic to peanuts.

CHEX MIX
(modified from Chex website)
Makes: 10 cups
Prep Time: 10 minutes
Cook Time: 45 minutes

Peanut-Free Chex Mix
Ingredients:
3 cups Corn Chex-type cereal 
3 cups Rice Chex-type cereal 
3 cups Wheat Chex-type cereal 
1 cup  pretzels 
6 tablespoons butter or margarine 
2 tablespoons Worcestershire sauce 
1 1/2 teaspoons seasoned salt 
3/4 teaspoon garlic powder 
1/2 teaspoon onion powder 

Instructions:
1. Heat oven to 250°F. 

2. In large bowl, mix cereals, and pretzels. 

3. In ungreased large roasting pan, melt butter in oven. I used my dutch oven.

4. Stir in seasonings. Gradually stir in cereal mixture until evenly coated. 

5. Bake 45 minutes, stirring every 15 minutes. 

6. Spread on paper towels to cool, about 15 minutes. 

7. Store in airtight container. 

Quicker Instructions:
Total time: 25 minutes
1. In large microwavable bowl, mix cereals, and pretzels
2. In small microwavable bowl, microwave butter uncovered on High about 40 seconds or until melted. 
3. Stir in seasonings. 
4. Pour over cereal mixture; stir until evenly coated. 
5. Microwave uncovered on High 5 to 6 minutes, thoroughly stirring every 2 minutes. 
6. Spread on paper towels to cool. 
7. Store in airtight container.

Enjoy!

Friday, April 18, 2014

Hubby Do: Bush Trimming

I just wanted to give a shout-out to my amazing hubby who trimmed the bushes in the back yard this weekend. Not only did he have to trim the bushes on our side of the fence, but he hopped over the fence and did the neighbors side. I know that this is the last thing that he wanted to do but, it looks so much better. 


One way or another, we will get the house and yard to how we want it. We will. We must.

Thursday, April 17, 2014

Bucket List

When I was in middle school, I started a bucket list by crossing two things off my list just as a started. Those two things were rock climbing and white water rafting. Since then, my list has grown and changed as Tony and I have found new things to try. Some things have been added just so we can cross them off. My list contains things both personal and professionally. 

Here is my current list: 

  • white water rafting (Summer 2001) 
  • rock climbing (Summer 2001) 
  • four wheeling (Summer 2005, Honeymoon - October 2013)
  • visit Ireland (Summer 2007) 
  • sky diving (Sky dive Happy Valley - May 2011) 
  • para-sailing (Aruba - March 2012)
  • Dune buggies (Aruba - March 2012)
  • try food at the night markets in Taiwan (octopus balls, stinky tofu, sticky rice (rice in duck's blood) (October 2012)
  • ultra-light flying (Honeymoon - October 2013) 
  • visit Ireland, again with Tony 
  • go on a cruise 
  • buy a house (February 22, 2013) 
  • visit the Grand Canyon
  • visit Yellowstone 
  • visit all 50 states in more just driving through
    • complete-20: AZ, DE, FL, HI, ID, IL, KY, MD, MI, NJ, NY, NC, OH, OR, PA, SC, TN, TX, VA, WA, WV 
    • remaining-30: AL, AK, AR, CA, CO, CT, GA, IN, IA, KS, LA, ME, MA, MN, MS, MO, MT, NE, NV, NH, NM, ND, OK, RI, SD, TN, UT, VT, WI, WY
  • visit all 7 continents 
    • complete: North America - US, Canada, Aruba, Europe - Ireland, Asia - Japan and Taiwan 
    • remaining: South America, Antarctica, Australia, Africa
  • Master's Degree (August 2012) 
  • FE/PE 
  • teach at a college (adjunct professor?)

Of course, my list will grow and change as new things pop into my head.

What's on your bucket list?

Wednesday, April 16, 2014

Home Fire Protection

Earlier this year, I had a safety meeting at work. There were a couple of things that really stuck with me so I decided that I needed to assess our homes fire safety systems. Here's the things I looked at: 
  • smoke alarms 
  • fire extinguishers 
  • clothes dryer
  • battery storage 
  • exit plan 
  • fire department 

Starting at the top... 

Smoke alarms
We had one alarm in the hallway going up to the bedrooms. I had never really looked at it so I assumed it was okay. The battery was dead. Uh oh! When did the battery die? Did it happen while we were on our honeymoon? Could we have been living in our house of a year without this smoke alarm working? It's possible. I never checked it. 

I didn't know how old the alarm was so we decided just to replace it. We replaced the one upstairs, installed one outside the kitchen, and one downstairs outside of the laundry room.

When I replaced it, there was segments of the NFPA 72 code in the pamphlet. It goes over what is required by law and what is recommended.  For example, in new construction, smoke alarms are required in every bedroom.  In our home, we are only required to have one per floor with the recommendation to have one in every room. 

NFPA is the National Fire Protection Association. According to their website (https://www.nfpa.org/), "The mission of the international nonprofit NFPA, established in 1896, is to reduce the worldwide burden of fire and other hazards on the quality of life by providing and advocating consensus codes and standards, research, training, and education. The world's leading advocate of fire prevention and an authoritative source on public safety, NFPA develops, publishes, and disseminates more than 300 consensus codes and standards intended to minimize the possibility and effects of fire and other risks."

Fire Extinguishers
This was easy.  We knew we were okay here.  We've got one in the kitchen and one in the laundry room.  Checking them was even part of my Monthly To Do List.

Clothes Dryer
This is something that I had heard about being a leading cause of house fires.  I actually knew an employee at Penn State who had their house burn down due to a dryer fire.  The dryer is very easy for people to do is to turn on the dryer before you leave.  This is not recommended!  Here's a list of recommendations from NFPA: Dryer Safety Tips.  Here's how I clean my lint trap: How To: Clean A "Clean" Lint Trap.  

Battery Storage
This was something that I hadn't given any thought to.  Just throw them in a box and you are good to go.  I was wrong.  The most common battery short is a 9V battery because the terminals are so close.  NFPA has a safety sheet just about 9V Battery Safety.  You can see a video about how a 9V battery started a house fire here.

Our batteries were just thrown in a box.  I bought a couple of battery storage cases and re-organized it.  Here's a look at our battery storage.

Exit Plan
Because we live in a tri-level, we've got multiple points of exit from the first two floors without a major drop.  On the first floor, we've got the front door, windows in the living room, windows in our office, and windows in the bathroom.  On the second floor, we've got the door to the garage, the windows out the front (with a slight drop), and the back door to the porch.  Those two are easy.  The third floor however, we've only got the windows or down the steps to the second floor.  If there's ever a fire in the kitchen, our only option is the windows.  Jumping out of a two story window was going to hurt.  We could exit to the roof over the front porch but there was still going to be a significant drop.  Our solution was an escape ladder.  Problem solved.

Here's some helpful information from NFPA about Escape Planning.

Fire Department
I didn't know the number of our local fire department.  Of course, 911 works but I wanted the actual number.  I used this website to find our local fire department number.  It appears as though they have every fire department in the county on that website.


Disclaimer: I am not a fire protection expert. I have just communicated what I have learned in my quest to update our home fire protection. If you have concerns, I would contact your local fire department.

Tuesday, April 15, 2014

First (Stress Free) Dinner Party

Since Tony and I bought our house, we've had family visit, a few friends over to hang out, and one Christmas Party.  I've wanted to have a dinner party but timing was always an issue.  We looked at the next several weekends and they were booked.  We decided this past weekend was the weekend to do it.  We invited over two other couples.  That was the easy part.  Next, I had to decide on the menu.

Here's what I wanted: 
- something simple and not too different/exotic 
- easy, casserole type meal where it cooks and can't overcook 

Here's where I ended up: 
Appetizers: 
Cheese, Pepperoni, and Crackers (prepared that morning) 

Main Meal: 
Ceaser Salad 
Rolls 
No Work Chicken with Rice (prepped Friday night, switched to casserole Saturday mid-day, put into oven when guests arrived) 
Broccoli 

Dessert: 
Homemade Chocolate Ice Cream 
Homemade Strawberry Ice Cream 
Easy Classic Brownies 

All that was left was to set the bar and the table. 


We had a great night and I can't wait to hold another dinner party!

Monday, April 14, 2014

Strawberry Ice Cream

With all the nice weather, I wanted to do something more springy.  I modified the Chocolate Ice Cream into Strawberry.  I dropped the milk content since the strawberry was going to add some liquid.  It's quite yummy and perhaps my favorite so far.  Here's the recipe!

STRAWBERRY ICE CREAM
Makes: 2.5 quarts
Prep and Cook Time: 3 hours
 
Strawberry Ice Cream

Ingredients: 
1 cup milk 
2 cups heavy cream 
2 cups strawberries 
1 cup granulated sugar 
1 tsp vanilla extract 

Instructions:
1. Blend the strawberries until they reach a consistency you like.  I blended mine until it was mostly blended with a few chunks.

2. Mix everything together.

3. Pour the mixture into an ice cream maker, and freeze according to the manufacturer's instructions. 

4. Freeze for at least 2 hours and store your remaining ice cream in an air-tight plastic container in the back of the freezer. This will help preserve the flavor and texture of the finished ice cream.

Enjoy!

Tuesday, April 8, 2014

How To: Easy Wall Repair

So when we bought our house, there were certain things that had not been touched in ages! One of these things was the thermostat. It was ugly and I hated it but it work so for the first year, we didn't do anything. Then the buttons started to only work when they felt like it. This was incredibly frustrating! We decided to buy a new thermostat and just swap them out. We thought it was going to be about $30 and 10-15 minutes to swap it out. We were wrong... 

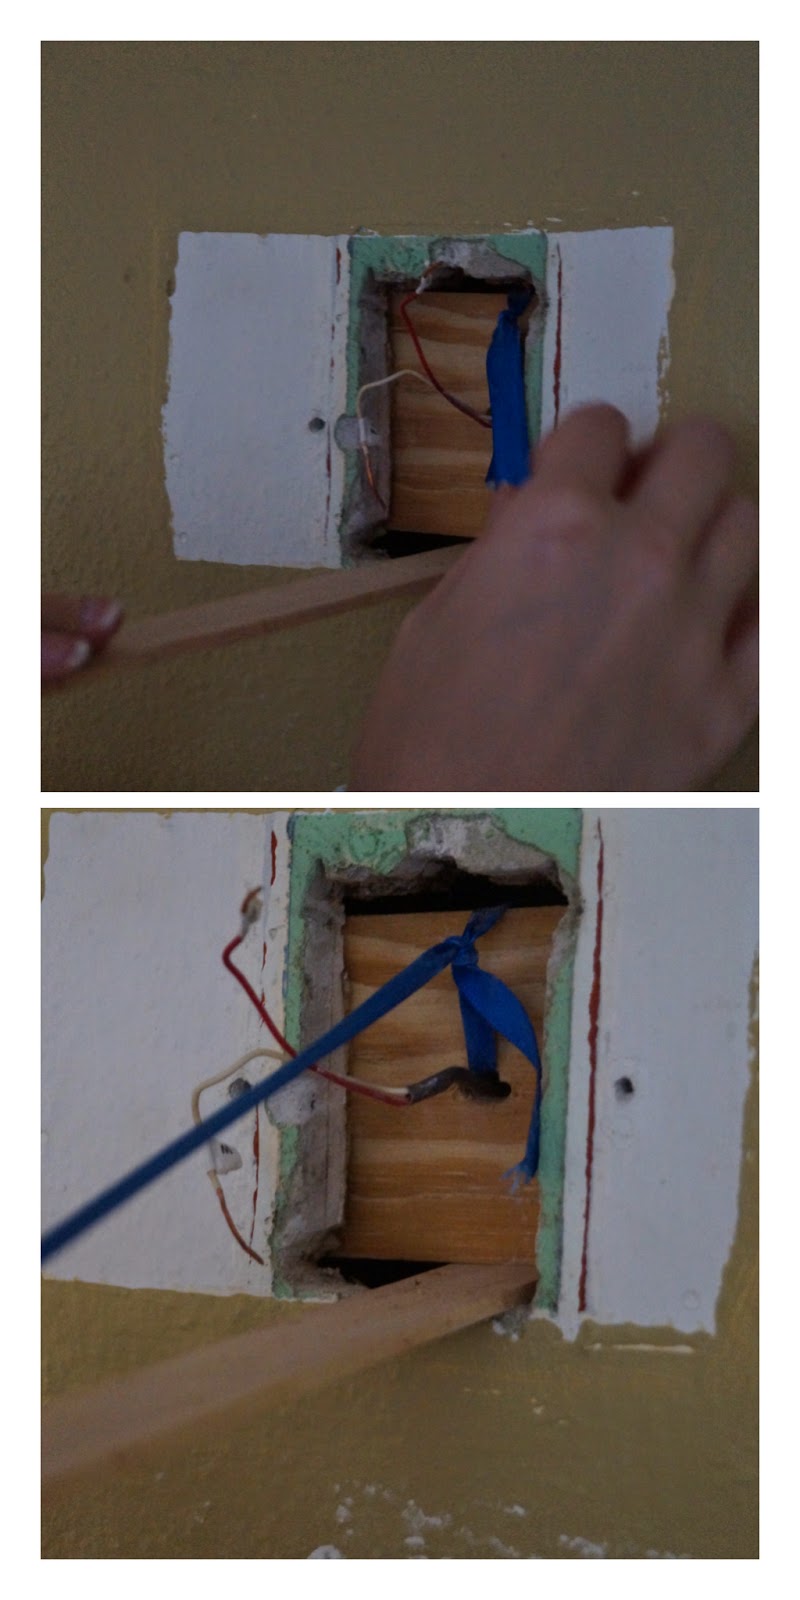
Apparently, they made the hole in the wall as tall as the old thermostat and the newer one was much more compact. Uh oh... We now had a few gaps above and below. The nice thing was that the mounting holes lined up! Minor success with an overall project failure.  The only thing to do was to repair the wall.  The problem was that it was going to be a little bit more than just a bit of putty.  After discussing the issue with my dad, I had a plan of attack.


Here's that I did.

Step 1: Find scrap wood or shims to create a back to build the putty on.  Fortunately, I had left over strips from our door project: How To: Build A Custom Door.  The strips were ripped thin enough that all I had to do was to cut it to length.

Step 2: Cut the wood to length.  Drill a hole to feel the wires through.  Make sure it is large enough to feed the wires through easily.  


Step 3:  Feed a rope through the hole and tie it where you can remove it.  I used a ribbon since it was lying around.  Feed the wires through the hole.  


Step 4:  Feed the block through the wall opening.

Step 5:  Support the wood to have it mostly centered in the hole.  I used a paint stirrer to keep it up.


Step 5:  Drill a couple pilot holes then screw the wood to the wall.


Step 6: Putty the hole to fit.  I was impatient (shocking, I know!) so I used a hair dryer to speed up the process.


Step 7: Sand and paint.

Step 8: Install new thermostat.

Project complete!!  I'm very happy with how it turned out!

My sister was a huge help during this process.  She took the lovely pictures and was happy to "hold this."  Thanks Amy!! 

Thursday, April 3, 2014

How To: Build an Emergency Fund

When Tony and I bought our house, this put us in a lot of debt. In our opinion, it is good debt but still debt. We realized that we needed an emergency fund. There are two components to the fund: a "Go to Hell" component and an "Oh Shit, Something Broke" component. 

Build an Emergency Fund
"Go to Hell" Component 
The practical reason for this fund is that if something happens to your job, you have a cushion to provide you time to find another job before you are in major trouble. The other, somewhat funny, reason was that if things get really bad at work, you can tell your boss "Go to Hell" and quit. This "Go to Hell" component was actually passed down from my grandfather. I chuckle every time I think about him possibly saying "Go to Hell" to his boss even though I don't think he ever did. Now, I want to make it very clear that neither Tony and I have any intention of doing this! We both love our jobs! 

After reviewing our current expenses, we realized that we are not living on just one salary. This means that if something happens to either on of our jobs, by choice or not, we can't afford our current living situation. We need a cushion to allow us to live until we can find more work. What amount of cushion do we need? If you Google "emergency fund," you'll see recommendations from $1000 to a full years salary. 

For us, we wanted to start with 3 months of expenses and eventually stretch to 6 months. When reviewing our budget, last year we averaged spending $9k a month. This number is heavily skewed because we dipped into our savings to pay for the down payment on our house plus everything for our wedding. When reviewing our budget this year, we are averaging ~$6k per month. This money includes everything that we spend along with what we save for home and car maintenance as well as vacations. So this means that our initial "Go to Hell" component, we need to save $18k. OH MY GOSH! This is terrifying! That's what the numbers say so that needs to be our first goal. 

"Oh Shit, Something Broke" Component 
This is pretty self-explanatory. With the purchase of our first home, there is no longer a landlord or rental agency to call if something breaks. For us, if something breaks, we've got to fix it or go without. In our house, there are several things that could break that would be an inconvenience but then there are those things that if they break, we're in serious trouble. I've broken the things in our house into three categories: Big Trouble, Inconvenience, and Really, Get Over It. 

Big Trouble - Majorly effect the useof the home 
     - Boiler (depending on the time of year)- No heat! 
     - Hot Water Tank - No warm showers! 
     - Refrigerator - No cold food! 

Inconvenience - Things that make living in the house easier but we don't really need it. 
     - Dishwasher - I've got two hands and a sponge 
     - Oven, Stove, Microwave - as long as I have one, we can make hot food. 
     - Washer/Dryer - there are Laundromats 

Really, Get Over It - Luxuries that we really don't need 
     - Garage door opener 
     - Lawn Mower/Snow Blower 
     - TVs, PS3, Speakers, Alarm Clocks 
     - Small Kitchen Appliances - Toaster, Mixer, Keurig, Wine Fridge 

Really the only things that would need to be replaced immediately are the items in the Big Trouble category. Of course, these are the most expensive things in the house. The Inconvenience category contains the things that I'd like to have replaced within a week or two. When looking at the Big Trouble category, the most expensive things are the boiler and hot water tank. We could be looking between $5-7k for a new one. The house is older and I think it's possible that we may need to replace one in the next year or two. This means, we need $7k just in case something goes wrong. 

Here's the total... 
     "Go to Hell" = $18k 
     "Oh Shit, Something Broke" = $7k 
     Emergency Fund Total = $25k 

For now, we are working towards the total. Once we reach it, I know we will re-evaluate and up each component to give us 6 months of expenses and two major repairs. I'm trying not to think about that just yet... Baby steps. 

The next question, is where do you keep this money. I've been placing this money into a money market account (MMA) for a couple of reasons. 
1. I get a slightly better return on my money. (Tiered Rate 0.15-0.4% - MMA vs. 0.1% -Savings) 
2. I am limited on the number of withdrawals a year. This keeps the money more off limits especially because it isn't accessible from an ATM. 
3. It creates a barrier in my mind. MMA = Emergency = DO NOT TOUCH! 

If you want to start your own emergency fund, here are my recommendations: 
1. Determine your average monthly expenses. 
2. Set aside $1000 to start and work your way towards your cushion amount. It could be 3 months, then 6 months, then a year of your expenses. 
3. Open a separate savings or money market account. This will keep your emergency money away from your normal checking and savings accounts. 
4. When you have enough saved up, investigate Certificates of Deposit (CDs) or other higher rate of return savings options. 
5. Re-evaluate anytime your expenses change (buy a house, move, children) 


Please let me know what you think! Do you do something different? 


*DISCLAIMER: I am not a financial expert. Everything listed above is based on my opinion and experiences. All situations are different and if need, contact a financial planner.
Related Posts Plugin for WordPress, Blogger...