When we moved into our new house, it was bigger than we needed but figured it would come in handy. With combining our two apartments, this instantly gave us a fully furnished guest bedroom. In our guest bedroom, we have a double bed. This is great when we had friends over but for our parents, they weren't going to sleep in a double bed together. This meant one parent got the bed and the other got the aero bed. If we were tight on space, this would have been fine but we had a perfectly good bedroom sitting empty.
After struggling with what I wanted to do, I settled on wanting a twin bed with a trundle. This would provide us the most flexibility without taking up a ton space. Here's the room as it is now. I HATE the color it's way to dark and makes the room feel small. I'm reaching out for ideas on what to do with the room.
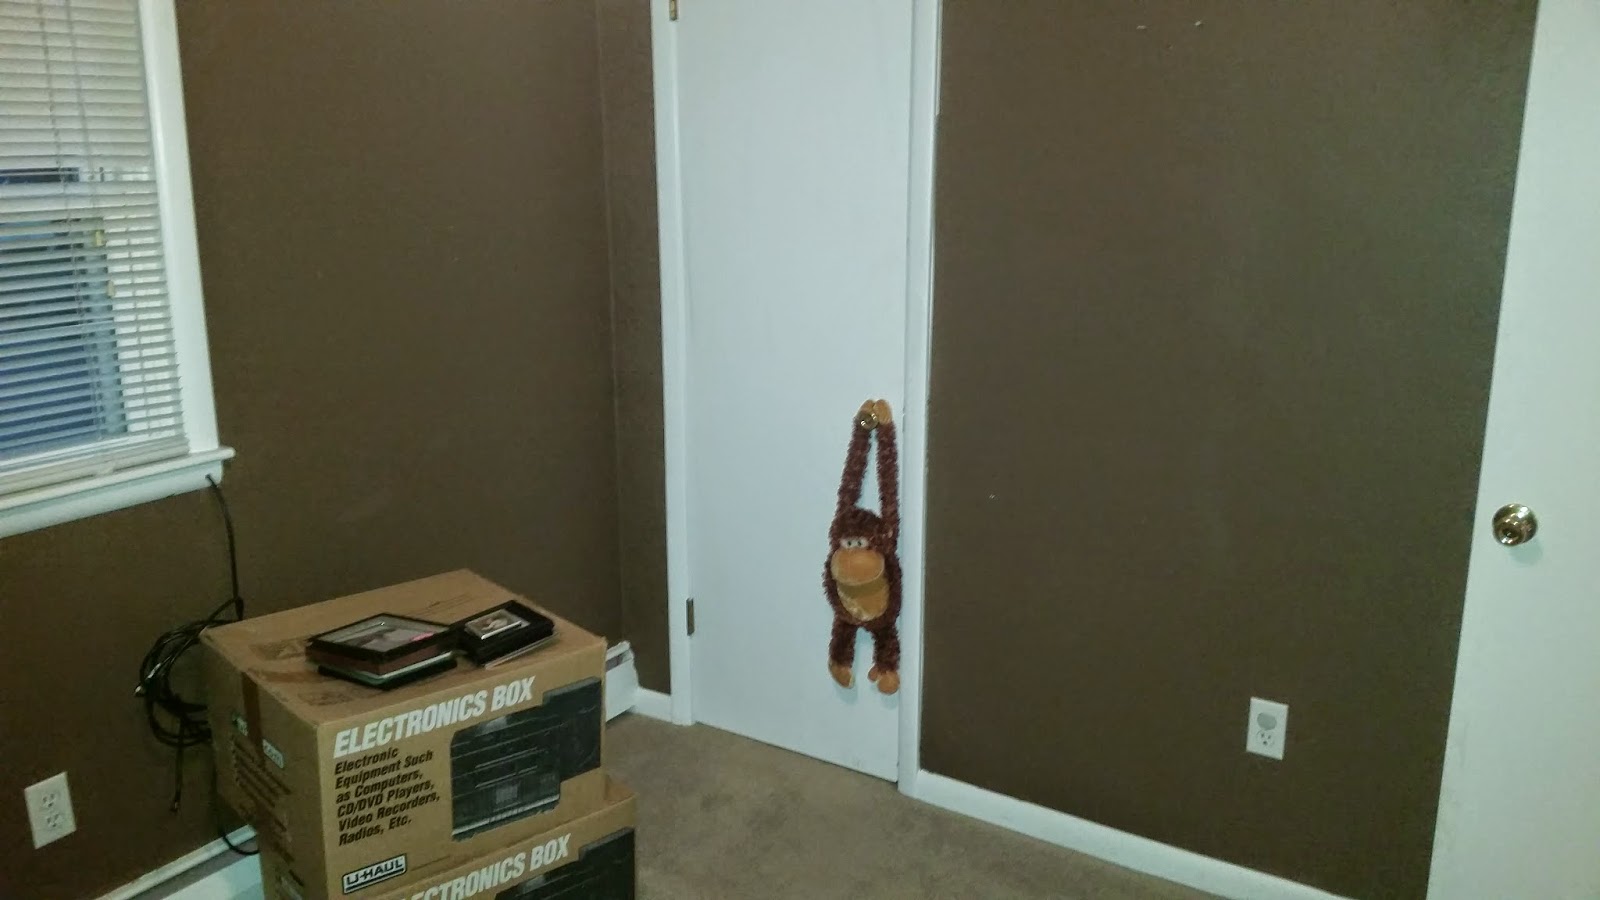
Any thoughts? Paint colors? Bed spread? Layout?
I'm hoping to update this room this fall!
Showing posts with label Home Improvement. Show all posts
Wednesday, October 8, 2014
Thursday, September 4, 2014
Happy 2 Years to Me!
Tony and I have been able to move forward with our future together. In the past 2 years, we've got engaged, bought a house, got married, and bought 2 motorcycles.
It's been a good two years and I'm excited for the many more to come!!
Wednesday, July 23, 2014
Garage Makeover
When we moved in, the garage was a holding place for a long time. A couple of weeks ago, my parents came to visit and we built the workbench. In anticipation for the project, I took an hour and moved stuff around or put it away. There was a huge improvement. Sweeping out the floor and cleaning up the cobwebs also helped tremendously.
Thanks for stopping by!
Wednesday, July 2, 2014
DIY Workbench
This past weekend was filled with a quick and easy project that made all the difference in the world. My parents came to visit and my dad helped us build a workbench. I wanted something that had a table top, a bottom shelf, a peg backboard, and an upper shelf. My dad had built a workbench years ago when they moved into their current house. We were going to build something similar.
When he built his, he used RTC2Z Rigid Tie Connectors. We used the same ones and they made the whole thing so easy!!
We also used plans from DIY Done Right as the starting point. We did modify them to create a 6' x 2' x 6' work bench rather than the 4' x 2' x 5' one that the plans had. We lifted the height of the table top as well since Tony and I are taller.
Here's what we did.
Step 1: Determine the size of the workbench and the materials required.
As I mentioned, we modified the design to give us a larger workbench. See our new plans below.
Here's what we needed for our larger workbench:
Tools Required:
Step 2: Purchase Materials.
The Rigid Tie connectors and SD Screws came from Home Depot. I had gotten them earlier in the week. Saturday morning we went to Lowe's and got the lumber, plywood, and pegboard. The nice thing about Lowe's, or any of the big hardware stores is that they will rip the large sheets for you. We had them cut the plywood and pegboard down for us. If you have this option, take it! The pieces are perfectly square and it saves a ton of time! This gave us:
Step 3: Cut to length

We had to cut our 2x4's to length. We followed the modifications that we made in Step 1.
We needed:
Step 4: Assemble end pieces.
Make sure you make opposites ends. You don't want two of the same ends.
Step 5: Install rails.
Step 6: Attach top rail using 2-1/2" screws.
Step 7: Corner out plywood and install.
Step 8: Attach pegboard
Step 9: Organize!
The larger size gave up plenty of room for our small and large tools.
The actual assembly of the workbench took us about 1-1/2 hours. Not bad at all!
Enjoy!
When he built his, he used RTC2Z Rigid Tie Connectors. We used the same ones and they made the whole thing so easy!!
We also used plans from DIY Done Right as the starting point. We did modify them to create a 6' x 2' x 6' work bench rather than the 4' x 2' x 5' one that the plans had. We lifted the height of the table top as well since Tony and I are taller.
Here's what we did.
Step 1: Determine the size of the workbench and the materials required.
As I mentioned, we modified the design to give us a larger workbench. See our new plans below.
Here's what we needed for our larger workbench:
Tools Required:
-
Saw
- Screw gun
- #2 Phillips head bit
- Tape measure
- Clamps
- Framing square
- 2" x 4" x 8' lumber -
6 pcs8 pcs 24" x 48" - ⅝" plywood sheet48" x 96" - 23/32" plywood sheet24" x 48"48" x 96" - ¼" pegboard sheet- (8) Rigid Tie RTC2Z Connectors
- (1 box) Strong-Drive® SD #8 x 1¼" Screws - 100 ct
(20)(36) #6 x 1¼" flat-head screws- (4) #6 x 2½" flat-head screws
Step 2: Purchase Materials.
The Rigid Tie connectors and SD Screws came from Home Depot. I had gotten them earlier in the week. Saturday morning we went to Lowe's and got the lumber, plywood, and pegboard. The nice thing about Lowe's, or any of the big hardware stores is that they will rip the large sheets for you. We had them cut the plywood and pegboard down for us. If you have this option, take it! The pieces are perfectly square and it saves a ton of time! This gave us:
- (2) 2' x 6' - 23/32" plywood sheets + scrap
- (1) 3' x 6' - 1/4" pegboard sheet + scrap
Step 3: Cut to length
We had to cut our 2x4's to length. We followed the modifications that we made in Step 1.
We needed:
- 1 - 72" piece for the top rail
- 2 - 70" pieces for the rear corner posts
- 4 - 69" pieces for the rails
- 2 - 38" pieces for the front corner posts
- 4 - 17" pieces for the end rails
Step 4: Assemble end pieces.
Make sure you make opposites ends. You don't want two of the same ends.
Step 5: Install rails.
Step 6: Attach top rail using 2-1/2" screws.
Step 7: Corner out plywood and install.
Step 8: Attach pegboard
Step 9: Organize!
The larger size gave up plenty of room for our small and large tools.
The actual assembly of the workbench took us about 1-1/2 hours. Not bad at all!
Enjoy!
Wednesday, June 25, 2014
Backyard Composting
I was on pinterest and a composting pin caught my eye. The pin redirected me to Someday I'll Learn. They talked about composting and how easy it was. I started to think about how much trash we throw out for just two people. We do the recycling thing but I thought we could do better.
I googled "composting chemung county" and was immediately directed to Chemung County's Composting Program. Crazy! Who knew? I read through everything that they said about composting and their program. I couldn't believe everything that you can compost. Here's the list of items that can and can't be composted. It looked pretty easy but it was going to take additional effort on our part. We could do it. I had looked at the bins we could get from Chemung county and fortunately, they were only $50. The actually retail for $199. I figure that's a pretty good deal. Next step, convince Tony. This was actually much easier than I thought. I sent him a "Wanna try?" e-mail and he said sure. Easy peasy.
A couple weeks ago, Tony set up the composter near the house but hidden from a main line of site. I had to get a countertop compost container. I wanted something that we could throw food scraps for a week then take them out to the compost bin. At first, I was planning on getting the OXO Good Grips Compost Bin mainly because Shelley works for OXO. Unfortunately, I didn't like how it didn't snap shut. I was worried about bugs and the smell. I ultimately settled on the Oggi Stainless Steel Composter. I liked the way the top nestled into the base and the filter.
Here's what I do when I take our kitchen scraps and add them to the outdoor composter.
Step 1: Add some "brown" from the above list. For me, It's leaves.
Step 2: Add the "green" from the above list. This is our kitchen scraps.
Step 3: Cover the "green" with "brown."
So far, there is no smell, no bugs, nothing. It's really nice.
Do you compost?
I googled "composting chemung county" and was immediately directed to Chemung County's Composting Program. Crazy! Who knew? I read through everything that they said about composting and their program. I couldn't believe everything that you can compost. Here's the list of items that can and can't be composted. It looked pretty easy but it was going to take additional effort on our part. We could do it. I had looked at the bins we could get from Chemung county and fortunately, they were only $50. The actually retail for $199. I figure that's a pretty good deal. Next step, convince Tony. This was actually much easier than I thought. I sent him a "Wanna try?" e-mail and he said sure. Easy peasy.
A couple weeks ago, Tony set up the composter near the house but hidden from a main line of site. I had to get a countertop compost container. I wanted something that we could throw food scraps for a week then take them out to the compost bin. At first, I was planning on getting the OXO Good Grips Compost Bin mainly because Shelley works for OXO. Unfortunately, I didn't like how it didn't snap shut. I was worried about bugs and the smell. I ultimately settled on the Oggi Stainless Steel Composter. I liked the way the top nestled into the base and the filter.
Here's what I do when I take our kitchen scraps and add them to the outdoor composter.
Step 1: Add some "brown" from the above list. For me, It's leaves.
Step 3: Cover the "green" with "brown."
So far, there is no smell, no bugs, nothing. It's really nice.
Do you compost?
Friday, June 13, 2014
Entryway Makeover
When we repainted the living room, I didn't want to put our makeshift entryway bench back. It was time to find a proper table. After searching in stores and online, we found something that would work. Viola!
Thanks for stopping by!
![]() |
Before and After |
Thanks for stopping by!
Thursday, June 12, 2014
Family Room: Paint Upgrade
A while ago, I posted about replacing our thermostat and fixing the wall. The gaping hole was the catalyst that I needed to get Tony on board with repainting the family room. Granted, the color wasn't horrible. It was slightly more pea green then I wanted but it was okay. The thing that was worse, was the paint job itself. There were so many short cuts that drove me nuts!
After repainting several rooms and the ceilings, we figured out the best way to repaint an entire room when we re-did out Bathroom/Laundry room. Paint the ceiling and the white trim first. Go back and tape them off before painting the walls. That's what Amy and I did when we repainted the family room.
I absolutely love the color and the clean lines that we were able to achieve. A slight color change, new ceiling paint and trim makes all the difference in the world! The pictures don't do it justice.
Happy painting!
![]() |
The errors! |
![]() |
Before and After |
I absolutely love the color and the clean lines that we were able to achieve. A slight color change, new ceiling paint and trim makes all the difference in the world! The pictures don't do it justice.
Happy painting!
Tuesday, May 27, 2014
Power-washing the House
Tony had to work this weekend so I took this opportunity to work on the house. The thing that I wanted to tackle was the one outside wall of our house. I don't think it had been cleaned in YEARS. Once again, my dad came to the rescue and he let me borrow his power-washer. It made a huge improvement.
I need to figure out how to clean the brick on the front of the house. The water alone wasn't enough. Dish soap? Bleach? Any ideas??
Before |
1/2 way done |
Close up of how bad it was |
Much cleaner! |
Next step |
Wednesday, May 21, 2014
The Pit - Clean-up
The people who owned the house before us had a swing set that sat in a mulch pit with a mini sandbox. We don't have a swing-set or kids. There's no immediate plan for needing a mulch pit. Last year, we wanted to rip it up but we didn't know what to do with the stuff. Tony and I both grew up with woods behind our homes. This was great for dumping leaves, grass, etc. Here, we don't have that luxury. So over the past year, we just left it.
When Tony and his dad re-did the pool deck, the old plywood went to the pit. When I trimmed the maple trees in front of our house, the branches went to the pit. When my dad and I made the new door to the garage, the old one when to the pit. This spring, I raked leaves while Tony trimmed the bushes in the back of the house. All of the leaves and bush trimmings, went to the pit. Now we had this huge pile of stuff that we needed to get rid of.
I called our garbage people and we could get a roll-off for a minimum of $112. This would be best case scenario if we did it all in one day and had 1/2 ton of debris. Anything more and the price would climb. I thought we could do better than that so I went to craigslist. I posted the ad and one day later plus $60, the big stuff was gone. Two guys came, in the pouring rain, and took the big stuff away. One guy finally came back this past weekend and took away the remaining stuff.
We need to finish stirring up the soil and plant some new grass. Hopefully in a month or so, the pit will be a distant memory.
The Pit |
When Tony and his dad re-did the pool deck, the old plywood went to the pit. When I trimmed the maple trees in front of our house, the branches went to the pit. When my dad and I made the new door to the garage, the old one when to the pit. This spring, I raked leaves while Tony trimmed the bushes in the back of the house. All of the leaves and bush trimmings, went to the pit. Now we had this huge pile of stuff that we needed to get rid of.
![]() |
The Full Pit |
I called our garbage people and we could get a roll-off for a minimum of $112. This would be best case scenario if we did it all in one day and had 1/2 ton of debris. Anything more and the price would climb. I thought we could do better than that so I went to craigslist. I posted the ad and one day later plus $60, the big stuff was gone. Two guys came, in the pouring rain, and took the big stuff away. One guy finally came back this past weekend and took away the remaining stuff.
![]() |
Cleared Pit |
We need to finish stirring up the soil and plant some new grass. Hopefully in a month or so, the pit will be a distant memory.
Thursday, May 8, 2014
Product Review - Scrub Daddy
So last summer, I got a Scrub Daddy for my Bridal Shower. I thought "Oh, how cute. A smiley face sponge." It is way more than a smiley face sponge. It is my new new best friend when it comes to washing dishes. It beats out my gloves and pan scraper.
Where can I find a Scrub Daddy?
Bed, Bath, and Beyond is where I got my new one for $3.99 + tax. You can also get them on Amazon.
Is it worth the price?
Absolutely! My first one lasted about 8 months. Whens the last time your sponge lasted that long? I will say that at the end of the 8 months, it was time to switch it out. Below is a photo comparing the old with the new. I probably should have changed it out sooner.
Does it really not scratch pans and dishware?
Yes. I used mine for everything including my non-stick Calphalon pans to my wine glasses and hand-wash only fine china. It has not damaged anything but get's everything off.
Does it really stay hard in cold water and hot in soft water?
Surprisingly yes! I've been cleaning dishes and I get to something that needs a little extra scrubbing power so I actually go from hot to cold water and it firms up. I scrub a bit with cold water to get everything off then use hot water to sanitize.
Have you tried the other uses recommended on the Scrub Daddy website?
I have not. Based on what I've seen with just my dish cleaning, I wouldn't doubt that it works as well as they say.
Do you have a Scrub Daddy? Do you love it as much as I do?
*I am not endorsed for this review. I just think everyone should try the Scrub Daddy!
Sunday, May 4, 2014
Pin·cesses
We've all heard about pinstrosities (http://pinstrosity.blogspot.com/). A pin·stros·i·ty is 1. a pin of great and often frightening size, force, or complexity or 2. A real life result of a pin.
What happens if a pin is a success? I call this a pin·cess.
Here are the original pins along with their successful completions.
Charger Clip
In the original pin, they used a binder clip. I used a clear Command clip so it is less noticeable.
Dish Soap Dispenser
I love how this one turned out.
Styling Tool Holder
A metal file folder plus a few command clips keep my hair tools contained. Tony greatly appreciates this pin·cesses.
Ticket Shadow Box
Mine is not as elaborate as the original pin but I still love it and it looks great on a shelf in our living room. It has tickets from all of our Penn State games along with old movie tickets and even my ticket to Taipei 101.
Here are some pins that I have tried and they really work! I don't have my own pictures of their pin·cesses.
Homemade Goo Gone
Lint and a toilet paper roll as a fire starter
Sheets in a linen closet
Folding all sheets and placing them inside one of the pillow cases keeps everything nice and tidy in the linen closet.
Wood spoon to stop water from boiling over
What pins have you tried that work??
What happens if a pin is a success? I call this a pin·cess.
Here are the original pins along with their successful completions.
Charger Clip
In the original pin, they used a binder clip. I used a clear Command clip so it is less noticeable.
Dish Soap Dispenser
I love how this one turned out.
Styling Tool Holder
A metal file folder plus a few command clips keep my hair tools contained. Tony greatly appreciates this pin·cesses.
Mine is not as elaborate as the original pin but I still love it and it looks great on a shelf in our living room. It has tickets from all of our Penn State games along with old movie tickets and even my ticket to Taipei 101.
Here are some pins that I have tried and they really work! I don't have my own pictures of their pin·cesses.
Homemade Goo Gone
Lint and a toilet paper roll as a fire starter
Sheets in a linen closet
Folding all sheets and placing them inside one of the pillow cases keeps everything nice and tidy in the linen closet.
Wood spoon to stop water from boiling over
What pins have you tried that work??
Labels:
DIY,
Home Improvement,
How To,
Organization,
Pin·cesses,
Quick
Wednesday, April 16, 2014
Home Fire Protection

- smoke alarms
- fire extinguishers
- clothes dryer
- battery storage
- exit plan
- fire department
Starting at the top...
Smoke alarms
We had one alarm in the hallway going up to the bedrooms. I had never really looked at it so I assumed it was okay. The battery was dead. Uh oh! When did the battery die? Did it happen while we were on our honeymoon? Could we have been living in our house of a year without this smoke alarm working? It's possible. I never checked it.
I didn't know how old the alarm was so we decided just to replace it. We replaced the one upstairs, installed one outside the kitchen, and one downstairs outside of the laundry room.
When I replaced it, there was segments of the NFPA 72 code in the pamphlet. It goes over what is required by law and what is recommended. For example, in new construction, smoke alarms are required in every bedroom. In our home, we are only required to have one per floor with the recommendation to have one in every room.
NFPA is the National Fire Protection Association. According to their website (https://www.nfpa.org/), "The mission of the international nonprofit NFPA, established in 1896, is to reduce the worldwide burden of fire and other hazards on the quality of life by providing and advocating consensus codes and standards, research, training, and education. The world's leading advocate of fire prevention and an authoritative source on public safety, NFPA develops, publishes, and disseminates more than 300 consensus codes and standards intended to minimize the possibility and effects of fire and other risks."
Fire Extinguishers
This was easy. We knew we were okay here. We've got one in the kitchen and one in the laundry room. Checking them was even part of my Monthly To Do List.
Clothes Dryer
This is something that I had heard about being a leading cause of house fires. I actually knew an employee at Penn State who had their house burn down due to a dryer fire. The dryer is very easy for people to do is to turn on the dryer before you leave. This is not recommended! Here's a list of recommendations from NFPA: Dryer Safety Tips. Here's how I clean my lint trap: How To: Clean A "Clean" Lint Trap.
Battery Storage
This was something that I hadn't given any thought to. Just throw them in a box and you are good to go. I was wrong. The most common battery short is a 9V battery because the terminals are so close. NFPA has a safety sheet just about 9V Battery Safety. You can see a video about how a 9V battery started a house fire here.
Our batteries were just thrown in a box. I bought a couple of battery storage cases and re-organized it. Here's a look at our battery storage.
Exit Plan
Because we live in a tri-level, we've got multiple points of exit from the first two floors without a major drop. On the first floor, we've got the front door, windows in the living room, windows in our office, and windows in the bathroom. On the second floor, we've got the door to the garage, the windows out the front (with a slight drop), and the back door to the porch. Those two are easy. The third floor however, we've only got the windows or down the steps to the second floor. If there's ever a fire in the kitchen, our only option is the windows. Jumping out of a two story window was going to hurt. We could exit to the roof over the front porch but there was still going to be a significant drop. Our solution was an escape ladder. Problem solved.
Here's some helpful information from NFPA about Escape Planning.
Fire Department
I didn't know the number of our local fire department. Of course, 911 works but I wanted the actual number. I used this website to find our local fire department number. It appears as though they have every fire department in the county on that website.
Disclaimer: I am not a fire protection expert. I have just communicated what I have learned in my quest to update our home fire protection. If you have concerns, I would contact your local fire department.
Tuesday, April 8, 2014
How To: Easy Wall Repair
So when we bought our house, there were certain things that had not been touched in ages! One of these things was the thermostat. It was ugly and I hated it but it work so for the first year, we didn't do anything. Then the buttons started to only work when they felt like it. This was incredibly frustrating! We decided to buy a new thermostat and just swap them out. We thought it was going to be about $30 and 10-15 minutes to swap it out. We were wrong...
Apparently, they made the hole in the wall as tall as the old thermostat and the newer one was much more compact. Uh oh... We now had a few gaps above and below. The nice thing was that the mounting holes lined up! Minor success with an overall project failure. The only thing to do was to repair the wall. The problem was that it was going to be a little bit more than just a bit of putty. After discussing the issue with my dad, I had a plan of attack.
Here's that I did.
Step 1: Find scrap wood or shims to create a back to build the putty on. Fortunately, I had left over strips from our door project: How To: Build A Custom Door. The strips were ripped thin enough that all I had to do was to cut it to length.
Step 2: Cut the wood to length. Drill a hole to feel the wires through. Make sure it is large enough to feed the wires through easily.
Step 3: Feed a rope through the hole and tie it where you can remove it. I used a ribbon since it was lying around. Feed the wires through the hole.
Step 4: Feed the block through the wall opening.
Step 5: Support the wood to have it mostly centered in the hole. I used a paint stirrer to keep it up.
Step 5: Drill a couple pilot holes then screw the wood to the wall.
Step 6: Putty the hole to fit. I was impatient (shocking, I know!) so I used a hair dryer to speed up the process.
Step 7: Sand and paint.
Step 8: Install new thermostat.
Project complete!! I'm very happy with how it turned out!
My sister was a huge help during this process. She took the lovely pictures and was happy to "hold this." Thanks Amy!!
Apparently, they made the hole in the wall as tall as the old thermostat and the newer one was much more compact. Uh oh... We now had a few gaps above and below. The nice thing was that the mounting holes lined up! Minor success with an overall project failure. The only thing to do was to repair the wall. The problem was that it was going to be a little bit more than just a bit of putty. After discussing the issue with my dad, I had a plan of attack.
Here's that I did.
Step 1: Find scrap wood or shims to create a back to build the putty on. Fortunately, I had left over strips from our door project: How To: Build A Custom Door. The strips were ripped thin enough that all I had to do was to cut it to length.
Step 2: Cut the wood to length. Drill a hole to feel the wires through. Make sure it is large enough to feed the wires through easily.
Step 3: Feed a rope through the hole and tie it where you can remove it. I used a ribbon since it was lying around. Feed the wires through the hole.
Step 5: Support the wood to have it mostly centered in the hole. I used a paint stirrer to keep it up.
Step 5: Drill a couple pilot holes then screw the wood to the wall.
Step 6: Putty the hole to fit. I was impatient (shocking, I know!) so I used a hair dryer to speed up the process.
Step 7: Sand and paint.
Step 8: Install new thermostat.
Project complete!! I'm very happy with how it turned out!
My sister was a huge help during this process. She took the lovely pictures and was happy to "hold this." Thanks Amy!!
Subscribe to:
Posts (Atom)